I just wanted to give a quick update to those who follow me on this blog. I broke ground on my new house and garage this past week. So hopefully within a few months I will have both buildings all framed up. I still will not be working on my lathes at that time as I will be concentrating on finishing the house before I can get back to work on the machines. The plan is to use the garage as a storage unit until everything can be moved into the house. This will save me having to pay a few months storage fees. I still keep an eye on the net ref lathes like mine and would like to pass on that on craigslist there is one of these lathes available in the Dallas Texas area. If you would like to check it out here is the Craigslist link Hardinge Lathe If anybody following this blog actually picks up this lathe please contact me so we can grab pictures and serial number for the registry I have.
Hopefully I will be able to update this blog with some actual work after the New Year. Until then be safe and enjoy the coming Fall.
All the best
Harold
Sunday, 28 September 2014
Friday, 27 June 2014
No news to report with the exception that later this summer I will most likely have another one of these lathes in my possession. Once the deal is done will advise you about it. As well Last summer a lady contacted me about a Hardinge Cataract Toolroom(QC) lathe they had. This person was from somewhere around the Flagstaff Arizona area. She contacted me after seeing my posts online in one of the Metal Forums I monitor, or after reading this Blog, ref restoring one of these Lathes. Unfortunately I have lost her email. Ma'am if you perchance read this thread could you please email or contact me via this Blog. Thanks very much.
On a personal note. I have about one month left in the current house before I take up residence with my Mom until my new house is built. I'm still hoping to start this endeavour in early September.
Well all the best for the rest of the summer.
Also Go Holland Go. Maybe this year she'll win the World Cup.
Harold
Sunday, 8 June 2014
Just a short little update. I've moved three loads of truck and trailer down to the new location in Niagara on the lake. This past weekend I went down with only the truck since I had long stuff that required the tailgate to be down for the trip. My garage is pretty empty and the house is getting bare as well. I've packed a lot of stuff already and all the pictures that were on the wall have been moved to my Mom's place. Moved all the scotch too this past weekend. I thought I would pass on a few pictures. The first one will be of the lot I have purchased and am awaiting possession. The trees on the left are on my property and will taken down by the seller.

As well after numerous iterations the following few pictures will give you a general view of what the house and garage will look like on the lot. The pictures unfortunately are not the best due to the way the cheap drafting program exports the image.


The garage will be 24ft deep by 32ft wide. The house will be 34ft wide by 54ft deep and then there will be a 6ft porch on the front and a 10ft porch on the rear. The way the house is built the deck surface will be 16ft by 17ft on the south east corner of the house. This will provide a nice area for table and chairs.
Well a couple of more trips back and forth and then the Movers will take all the big stuff a month from now.
Well to all enjoy the warm weather and have a great summer
Harold
As well after numerous iterations the following few pictures will give you a general view of what the house and garage will look like on the lot. The pictures unfortunately are not the best due to the way the cheap drafting program exports the image.
The garage will be 24ft deep by 32ft wide. The house will be 34ft wide by 54ft deep and then there will be a 6ft porch on the front and a 10ft porch on the rear. The way the house is built the deck surface will be 16ft by 17ft on the south east corner of the house. This will provide a nice area for table and chairs.
Well a couple of more trips back and forth and then the Movers will take all the big stuff a month from now.
Well to all enjoy the warm weather and have a great summer
Harold
Saturday, 10 May 2014
Just a short update. If all goes well on Monday will be putting in an offer on Lot in Virgil Ontario. Lot is 63ftwide by 200ft long and has all city services at the lot line. This will allow me to build a nice house with a decent sized garage. Only real issue is that I most likely will not get possession of the lot until Mid August which means I will not be in the house until late this year. This means not much more restoration news until very late this year or early next year once the garage is usable.
This weekend will be taking the first of at least three loads by truck and trailer down to the Virgil area. I planned on moving all my tooling and the things the movers will not take and let them do the rest of the house. So yesterday I loaded up the #86 lathe into the back of the pickup truck and this morning I loaded the Van Norman #10 mill and a snowblower. Here are a couple of pictures showing the load.


Tomorrow morning at the crack of dawn we'll be off down the 401 to St Catharines to drop all this stuff off in my Mom's garage. Unfortunately I the storage facility that I want to use in Virgil is full up and will not have a unit available until end May. This means my next load will be beginning of June hopefully straight into the storage facility. This load will stay in my Mom's garage until either the house is ready or I need to move it due winter approaching.
One thing to relate on the restoration front. It's amazing the things you find out when you take things apart especially if you have two of the same machines to compare to each other. When I restored the #39 the crossfeed nut which is a Bronze alloy was secured to the crossfeed assembly by a plain old bolt. When I was disassembling the carriage for moving I noticed that there was a screw in the bolt on this carriage. I initially thought this might be a locking screw assembly however upon removal and clearing the bolt head. I noticed the word "Oil" on the bolt head. After removal I noticed a hole completely through the bolt to allow oil to be inserted to oil the crossfeed thread. So evidently on the #39 either somebody lost this nut or damaged it and replaced it with a plain old bolt. I guess when I am up and running will need to make a bolt similar to the one from the #86 for the #39.
Well all the best and enjoy the coming months. The weather is finally starting to get warm here such that the neighbourhood kids were even playing with soaker guns yesterday. Hurray for warm weather.
Harold
This weekend will be taking the first of at least three loads by truck and trailer down to the Virgil area. I planned on moving all my tooling and the things the movers will not take and let them do the rest of the house. So yesterday I loaded up the #86 lathe into the back of the pickup truck and this morning I loaded the Van Norman #10 mill and a snowblower. Here are a couple of pictures showing the load.
Tomorrow morning at the crack of dawn we'll be off down the 401 to St Catharines to drop all this stuff off in my Mom's garage. Unfortunately I the storage facility that I want to use in Virgil is full up and will not have a unit available until end May. This means my next load will be beginning of June hopefully straight into the storage facility. This load will stay in my Mom's garage until either the house is ready or I need to move it due winter approaching.
One thing to relate on the restoration front. It's amazing the things you find out when you take things apart especially if you have two of the same machines to compare to each other. When I restored the #39 the crossfeed nut which is a Bronze alloy was secured to the crossfeed assembly by a plain old bolt. When I was disassembling the carriage for moving I noticed that there was a screw in the bolt on this carriage. I initially thought this might be a locking screw assembly however upon removal and clearing the bolt head. I noticed the word "Oil" on the bolt head. After removal I noticed a hole completely through the bolt to allow oil to be inserted to oil the crossfeed thread. So evidently on the #39 either somebody lost this nut or damaged it and replaced it with a plain old bolt. I guess when I am up and running will need to make a bolt similar to the one from the #86 for the #39.
Well all the best and enjoy the coming months. The weather is finally starting to get warm here such that the neighbourhood kids were even playing with soaker guns yesterday. Hurray for warm weather.
Harold
Saturday, 26 April 2014
Well I hope you all had a nice Easter. I also hope that spring and summer come soon. This cold weather we're having is starting to become depressing. However there are at least two good things that have happened lately. The first is that my house has officially sold and I will be moving to St Catharines/Niagara-on-the-lake later this summer. Because of this I will be essentially putting my blog on hold until I am up and running in the new house. This edition will be the last big writeup for restoration purposes. I may put up some small updates as the summer goes, but this will most likely be the last restoration work related blog until my guess the end of summer. So for those who look me up I wish you all the best for the summer and look forward to seeing you come back in late summer early fall for more updates.
The other good news is that as of now we have success on repairing the broken teeth on the Bull and Back gear. As you recall when I left you two weeks ago I had brazed one tooth on the back gear and was getting ready to weld up the second gear. Well the second gear was brazed up and once cool both welds were cleaned up and filed down to tooth height. Here are two pictures showing the braxing on opposite sides of the gear and one side filed down to height.


Now it was over to the milling machine to use the involute gear cutters I bought to cut out the tooth profile. Prior to doing this I roughed out some slots for the space between teeth so as to minimize the amount of material the cutter needed to remove. I snugged up the gear in the vice and then using a square ensured the groove was vertical to the milling table by lining up the groove with the centre of the shaft and then rotating the gear until the centre of the groove lined up with the square. This took a little time but worked out pretty good. I then moved the table in so the cutter centre was lined up with the centre of the groove. As the cutting operation was carried out I slightly adjusted this "Y" axis to ensure proper tooth placement. After have a dozen passes going no more than 15thous at a time the first groove was done. Then rotate the gear and do the process all over again. After 4 setups both gear teeth were cut out. Checked them with the Bull gear and they work pretty good. I will need to clean them up slightly with some filing however for now the Back gear is replaced. Here are some pictures showing the various setups and the results of the milling process.


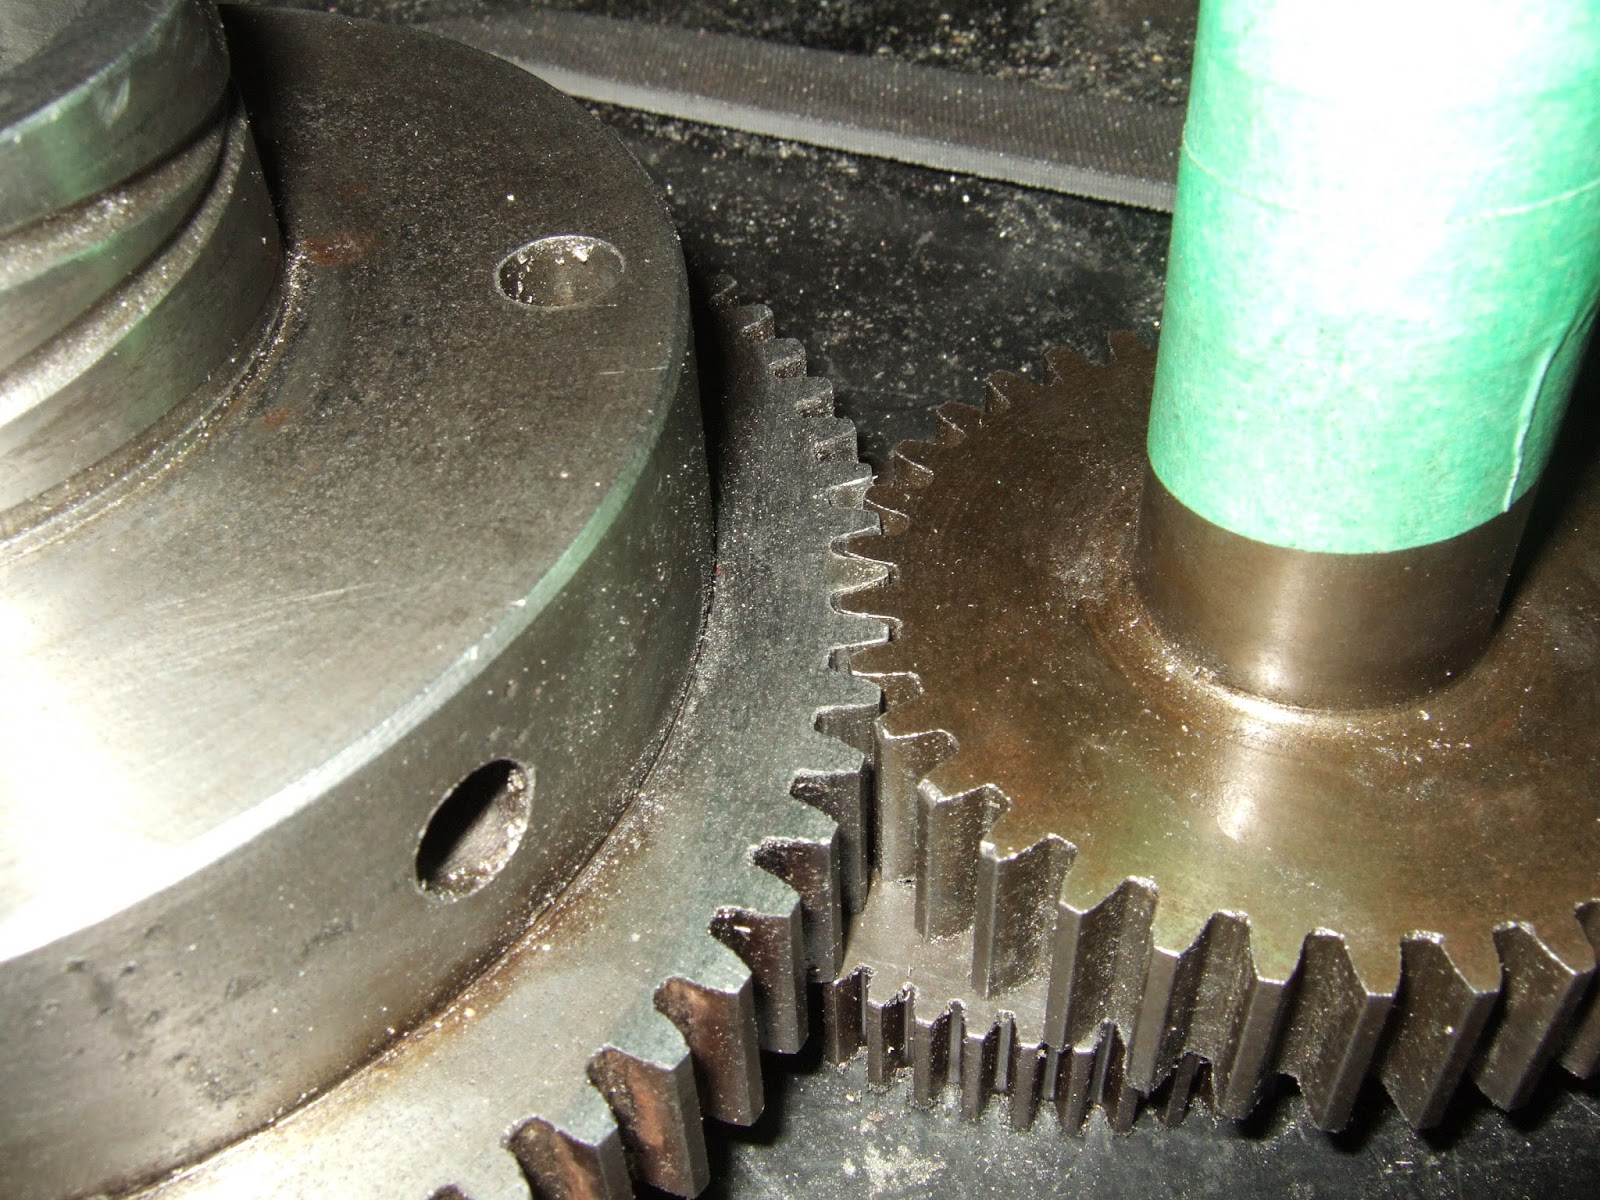
After this proved to be successful I carefully brazed up the Bull gear by the same process. Drilled and tapped for 2 #10-24 set screws and then heated up the part. Brazed in the repair and placed in the kitty litter for cool down. Once part was cooled removed and cleaned up the brazing as well as cut some grooves to remove material prior to machining. Once this was done over to the mill and same as before centred up the part using square and cut first groove. Once this was done repeat for second cut. On the Bull gear only one tooth was broken and missing so after two operations we were done with the Bull gear. Then it was over to the bench to finish file the tooth down. One of the reasons for filing is that although this is the correct cutter there was an ever so slight difference in the profile of the cutter and the original teeth. The cutter left a more rounded bottom were as the original tooth profile had a squarer bottom as well I needed to then the tooth slightly. The cutter seemed to be slightly thinner than the groove in the original teeth. Oh well nothing that 20 min at the table filing couldn't fix. Here are some pictures of work on the Bull gear and the final shot showing the meshing of the teeth from Bull to Back gear.


The last thing I've done is clean up the Back gear and then prime and paint the rough cast iron surface. Here is a final pictures showing the back gear prepped and primed.


Well as mentioned above this will be the last installment of the restoration Project until I get setup in my new house. Over the next few weeks I will be going to the new location to find a house and then I plan on moving the machinery myself during the Month of May by doing weekly trips to visit Mom and dropping of stuff into storage. I will most likely just post small updates on how everything is going but no major write ups till late summer or early fall. Until then have a great summer and don't get to sunburned.
Harold
The other good news is that as of now we have success on repairing the broken teeth on the Bull and Back gear. As you recall when I left you two weeks ago I had brazed one tooth on the back gear and was getting ready to weld up the second gear. Well the second gear was brazed up and once cool both welds were cleaned up and filed down to tooth height. Here are two pictures showing the braxing on opposite sides of the gear and one side filed down to height.
Now it was over to the milling machine to use the involute gear cutters I bought to cut out the tooth profile. Prior to doing this I roughed out some slots for the space between teeth so as to minimize the amount of material the cutter needed to remove. I snugged up the gear in the vice and then using a square ensured the groove was vertical to the milling table by lining up the groove with the centre of the shaft and then rotating the gear until the centre of the groove lined up with the square. This took a little time but worked out pretty good. I then moved the table in so the cutter centre was lined up with the centre of the groove. As the cutting operation was carried out I slightly adjusted this "Y" axis to ensure proper tooth placement. After have a dozen passes going no more than 15thous at a time the first groove was done. Then rotate the gear and do the process all over again. After 4 setups both gear teeth were cut out. Checked them with the Bull gear and they work pretty good. I will need to clean them up slightly with some filing however for now the Back gear is replaced. Here are some pictures showing the various setups and the results of the milling process.
The last thing I've done is clean up the Back gear and then prime and paint the rough cast iron surface. Here is a final pictures showing the back gear prepped and primed.
Well as mentioned above this will be the last installment of the restoration Project until I get setup in my new house. Over the next few weeks I will be going to the new location to find a house and then I plan on moving the machinery myself during the Month of May by doing weekly trips to visit Mom and dropping of stuff into storage. I will most likely just post small updates on how everything is going but no major write ups till late summer or early fall. Until then have a great summer and don't get to sunburned.
Harold
Sunday, 13 April 2014
Well it wasn't quite one of those 2ft forward 1ft backward week although at times it felt like it. One of the first things to do was finish making the small locating tabs for the Dividing head and tailstock. Last week I finished off making the small tabs, I just had to drill and tap them. Initially was going to do this on the drill press however I do not have a small drill press vise. So into the milling machine vise all four pieces went. Centred up the mill over the parts and then drilled them out. Once drilled they were countersunk to allow a countersunk screw to be used to secure them to the Dividing head and tail stock. Here are a couple of pictures showing this process. In the third picture the Tailstock is back on the mill located nicely in the grooves.


Then slowly over the week I worked on trying to repair a couple of change gears before I start the repair job on the back gear. How does that adage go " Practice, practice, practice" Looks like I still need to practice. My first braze trial did not survive the cutting process. Evidently I did not get a sufficient bond between the cast iron and the braze. For instance an entire tooth came off when it was almost profiled. However that's not a big problem we just go back to the practice table and try again. Although these are original gears they are not critical to make the lathe work and if need be can be replaced. After a few trial and errors I finally got the smaller of the two gears to work. It took a combination of milling and filing but it essentially works as a gear should. I will most likely still do a little touch up on it when I mount it on the lathe and check the smoothness with another gear. However that will be done somewhere down the road. Here is a picture of the smaller gear. First picture is when mounted on the dividing head the second one after the job is finished. The more astute of you will realize that it is not perfect and that one tooth still has some of it's mass missing however as of now it will work until I decided to either redo it or replace it.


Then slowly over the week I worked on trying to repair a couple of change gears before I start the repair job on the back gear. How does that adage go " Practice, practice, practice" Looks like I still need to practice. My first braze trial did not survive the cutting process. Evidently I did not get a sufficient bond between the cast iron and the braze. For instance an entire tooth came off when it was almost profiled. However that's not a big problem we just go back to the practice table and try again. Although these are original gears they are not critical to make the lathe work and if need be can be replaced. After a few trial and errors I finally got the smaller of the two gears to work. It took a combination of milling and filing but it essentially works as a gear should. I will most likely still do a little touch up on it when I mount it on the lathe and check the smoothness with another gear. However that will be done somewhere down the road. Here is a picture of the smaller gear. First picture is when mounted on the dividing head the second one after the job is finished. The more astute of you will realize that it is not perfect and that one tooth still has some of it's mass missing however as of now it will work until I decided to either redo it or replace it.
Once this was finished I went onto the larger gear, the 90 toother. Again brazed the area with the missing tooth however the adjoining brazed teeth started to melt so had to go over that section as well. Once it had cooled down in the Kitty Litter I filed it down smooth on the sides and on the top before mounting it in the Dividing head. Here are a couple of pictures showing this before the milling began. After mounting this I realized I should also use the tailstock to secure the arbor so I centre drilled the arbor on the lathe. I then mounted the tailstock back on the mill and slid the tailstock up and used it to help secure the arbor. One other issue I noticed is that this dividing head does not have a lock on it so when milling the teeth there is an ever so slight movement of the gear from the backlash in the dividing head gears. Not a great amount however there is a slight movement. Whether this will affect the operation is yet to be seen, I do not have the experience to say yea or nay.
Again we noticed that my welding was not quite up to par. This time though we also lost the repaired teeth from a previous owner. The ones that started melting when I was working on the adjacent tooth. However I was surprised a bit in that the repaired section had been milled flat and then the braze was added. It almost looks like they did not weld the braze in they may have silver soldered a block in and then cut the teeth. However I do need to go back to the drawing board on repairing this gear. I might make one more attempt at brazing or I'll just mill out a section and then fit in a replacement block that will be pinned in place and then cut the teeth required. Here is a picture showing the gear as it sits. You can see the original repaired tooth piece on the left side of the gear and the milled flat part on the right side. The original broken tooth that I was trying to repair is shown in the picture with a small hole drilled into the root of the tooth. I figured this might be a spot where a little more braze could flow in and provide more of a locking point for the repair job.
So I went back to another scrap gear and played around with brazing that one as well. I believe that on that one I have a much better bond between cast iron and braze. I was a lot more careful where I placed the heat. I have come to the conclusion though that for a non professional such as myself that smaller gears are probably harder to do since I've noticed that if you are not careful with the heat you tend to get adjacent teeth starting to melt since they are so small. I would hope that with larger thicker teeth you have less of an issue with this. So with this all done I decided to make my attempt at repairing the two broken teeth on the back gear. Now on this gear there are two broken teeth about 180deg apart. I drilled two holes into the tooth root and tapped them for a pair of #10-24 allen set screws. I figure this will be my mechanical lock between the cast iron gear and the brazed tooth. Then very carefully warmed up the part and then started to heat the immediate area of the broken tooth to weld it up. Of course the two set screws turned cherry red much earlier then the surrounding cast iron so I had to be careful there getting the cast iron pliable without destroying the set screws. I believe I managed that and got I believe a pretty reasonable braze job on one of the teeth. I then applied a little post heat before dumping it into the Kitty litter to cool down overnight. One thing that was a little different here was that there was a lot more violent reaction between the set screws and the braze when it was being applied. Today pulled out the back gear from the kitty litter and cleaned it up. I will either weld up the second one this afternoon or tomorrow. However as of now here are two pictures showing the resultant braze job before filing it down to size. At that point I will cut some grooves where needed and then place on the Mill for the final profile cut.
So for the next few days I will continue to work on this back gear.
On another note It has come to my attention that the owner of one of these lathes is looking at selling his lathe. If anybody out there has a serious interest in maybe owning one of these lathes please let me know and I will put you in contact with the seller. I will state though that the lathe will need a little bit of work and she is missing a few cosmetic items.
Well since next week is Easter I'm not sure when the next post will be. It will all depend on how much I get done and when I go to visit my Mom. So until the next post Happy Easter and have a great time hunting Easter eggs with the kids or grandkids and enjoy that Easter Ham.
Harold
Saturday, 5 April 2014
Well after a few weeks of doing nothing we are back at work. I did not do any restoration on the lathe itself I just worked on items that needed to be done to eventually push things forward on the lathe. For instance I finished off the welding cart I was building. I rounded some flat stock and welded it to the bottom of the dolly I used so that the bottles are secured in the cart. I welded up some hooks for the chain that also helps secure the bottles. I then welded up some 3/8" rod on the back of the dolly to hang the hoses from. I then cut out from sheet stock an accessories tray that was welded in between the dolly vertical bars under the handle. Here are some pictures showing all this work. These first two show the flat bar rounded up and then welded to the bottom of the dolly


These next few show the sheet stock that was cut to shape and then using a piece of old angle iron and the edge of the welding table bent over such that when finished I had a rounded over lip. This gave me a stronger edge and a smooth edge such that I would not cut myself on it.


The following pictures show the cart with the hose hanger welded on as well as it painted, and then with the tanks installed.


Once this was done I went to work on my dividing head for the Van Norman mill. I will need this dividing head up and working to be able to fix and then cut new change gears for the lathe. When I bought this dividing head it did not come with a collet draw bar. I managed to find one on Ebay that I thought would work. I bought it and finally picked it up from the sister last week while at my Mom's place. When I brought it home and tried it out it was 1" to long on the shaft. I emailed a fellow who also had this style of dividing head and he advised me that his draw bar was just as long as the one I had and it worked fine. After doing some research on the Vintage Metalworking website I came to the conclusion that Van Norman made an early and a later version of the #7 1/2 Dividing head that I have. The earlier version is about 1" shorter than the later version and has a few other differences as well. There was enough thread in the tube that I could cut approx 1/2" off the end. I then had to make a large spacer bushing to fit over the tube to be able to accommodate the other 1/2" that I needed to compensate for. Because I could not remove the entire 1" from the tube I also had to make a smaller bushing that slid on the tube and centred the tube in the dividing head mechanism. So first I made the smaller bushing out of an old bronze bushing I got with one of my projects. Here are a couple of pictures of machining the bushing and then with it sitting on the tube. I had to heat the bushing up to expand it slightly for it to go on the tube. This worked out great because now I know that it is securely in place.


Here are a few pictures of the larger bushing. This bushing once inserted was silver soldered in place as it was just a little too big to be a force fit. The last picture shows the drawbar in the dividing head holding a collet at the other end as it should.


The next thing I worked on was making some locating tabs for the bottom of the Dividing head and the tailstock. This is just 4 pieces of 1/2"wide steel that I cut down to 3/8" thick that are now cut down and edges filed so they will fit in the grooves on the bottom of the dividing head and the tailstock. This will then lock them in place on the milling machine table and prevent them from moving along with the lock down bolts. As well it aligns them in line with the "x" axis of the milling machine and therefore setup is easier when you need to used these pieces of equipment. Here are a few pictures showing what I mean.


I still need to drill them out and countersink them for some 1/4" bolts to secure these tabs to the Dividing head and tailstock.
Lastly I tried a brazing repair job on a scrap gear I had. Since I now have a #2 and a #4 brazing tip I can work on thicker metal gears and see how it works. Well I need more practice it seems. I did not get a good bond between the braze and the Cast Iron. Hopefully this week we will have some warm weather such that I can open the garage door and practice with the Oxy-Acetylene system.
Well that's all for this week. I hope to have much more news next week as I now have all the time in the world to work on this project. Until my house sells I plan to do as much as possible since once the house sells I will start packing things up and moving them to my new location.
See you again
Harold
These next few show the sheet stock that was cut to shape and then using a piece of old angle iron and the edge of the welding table bent over such that when finished I had a rounded over lip. This gave me a stronger edge and a smooth edge such that I would not cut myself on it.
Here are a few pictures of the larger bushing. This bushing once inserted was silver soldered in place as it was just a little too big to be a force fit. The last picture shows the drawbar in the dividing head holding a collet at the other end as it should.
Once this was done I went back to working on the mandrel I talked about prior that will be used to hold the changes gears on the dividing head so they can have their teeth cut and or repaired. In order to lock the gears in place I needed to cut a 1/8" keyway to match the keyway on the gears. I initially planned on buying a woodruff key cutter to do this, however the local store did not have any. They did however have 1/8" HSS spiral cutters. So I picked up two thinking that at this size there was a good chance I would break one before I was finished cutting the slot. So over to the Van Norman Mill set up the mandrel in the vice and then very carefully with the mill at it's highest speed cut out the groove. Recommended speed should have been around 1000rpm for this cutter but the max the mill will go is approx 390rpm. With all this in mind I took it slow and easy and only took .005" depth of cuts per pass. I needed to do 14 passes to get the slot down to the correct depth. Well 14 passes later it was done and I did not break the cutting bit. Here are a couple of pictures showing it in the mill and then with a gear on it trying it out. I then cut the keyway shaft to length rounded the edges and attempted to silver solder this one in place also, but it was dismal failure. Once cool I will clean it all up and work on a different method of securing the keyway in the mandrel.
The next thing I worked on was making some locating tabs for the bottom of the Dividing head and the tailstock. This is just 4 pieces of 1/2"wide steel that I cut down to 3/8" thick that are now cut down and edges filed so they will fit in the grooves on the bottom of the dividing head and the tailstock. This will then lock them in place on the milling machine table and prevent them from moving along with the lock down bolts. As well it aligns them in line with the "x" axis of the milling machine and therefore setup is easier when you need to used these pieces of equipment. Here are a few pictures showing what I mean.
I still need to drill them out and countersink them for some 1/4" bolts to secure these tabs to the Dividing head and tailstock.
Lastly I tried a brazing repair job on a scrap gear I had. Since I now have a #2 and a #4 brazing tip I can work on thicker metal gears and see how it works. Well I need more practice it seems. I did not get a good bond between the braze and the Cast Iron. Hopefully this week we will have some warm weather such that I can open the garage door and practice with the Oxy-Acetylene system.
Well that's all for this week. I hope to have much more news next week as I now have all the time in the world to work on this project. Until my house sells I plan to do as much as possible since once the house sells I will start packing things up and moving them to my new location.
See you again
Harold
Sunday, 23 March 2014
Sorry there will not be a descriptive post this week as essentially nothing was done. I did manage to get some time to work on building a cart for the Oxy-Acetylene tanks however nothing was done on the lathe.
I am still awaiting some welding tips for the torch set to be able to braze the gears with the broken teeth. There will also be no post next week Sunday as I will be visiting my Mom. The only essentially good news this past week was I spent my last day working the Ops desk at my Squadron. Next week we need to clear out so that on Tuesday afternoon I have my last release interview and my 32yr plus career in the Canadian Armed Forces, now the Royal Canadian Air Force will have ended. I look forward to some new enterprises and being able to work more on restoring this lathe and possibly other machines as well in the coming future.
See you in a few weeks.
Harold
Saturday, 15 March 2014
Well first of all my apologies for not posting last weekend. I ended up having a cold for most of the week prior which kept me from doing much extra work as well, I ended up going into work last week Saturday to deal with a unserviceable aircraft overseas. I did manage to get a little work done this week, however again weather and getting tooling or supplies sometimes delayed the work I wanted to do. We did have some fun this week, took the Income tax refund cheque and went out and bought a Victor Medalist 250 series torch set with owner owned tanks. Bought this at the Belleville Linde store where they were on sale for 250$ for the torch set and then another 400$ to buy and fill a set of tanks. We are now able to do Oxy-Acetylene welding and cutting. Here are a couple of pictures of the new toys. Unfortunately I forgot to check the size of the tips with the kit and which size I would require. The kit came with a #0 tip and I will need to purchase a #2 and a #4 as I will need the #4 to work on brazing the broken gears. Oh well another trip into town on Monday morning maybe.


One big reason for this was the ability to braze repair the missing teeth on the back gear and the large gear on the headstock. The back gear is missing 2 teeth approx 180deg apart and the large gear on the headstock is missing one tooth. The plan is to drill into the gear two holes for #10-24 set screw. Screw the two set screws in and then braze around them to fill in where the tooth would be. Once cold clean up the area, grind down the excess braze and then carefully groove out either side of where the teeth would be and then mount the gears in the milling machine and using the proper involute cutter cut new teeth as required. I have one of the two involute cutters here just awaiting delivery of the second one. Here is a picture showing the back gear and the set screw sitting on it. It is not installed because I am waiting for the local Fastenal office to order in a #10-24 bottoming tap.

Last week I mentioned that I was missing a few plates for the Van Norman Dividing head I have. Well over the past little while I've been talking to a fellow in the USA who had a webpage talking about these dividing heads. I had asked him if he had extra plates since he had discussed having a few machined up. Well in conversations he mentioned he did have some however he was waiting to machine up one more set.
Once that was done he would ship me a pair of dividing plates. Well this week was like Christmas, the brand new dividing plates showed up and so far he is refusing my offer of payment for these plates. I am definitely thankful for his generosity. With these two plates and the one I had previously I now have all I need to use this dividing head to repair and manufacture all the gearing for this lathe. Here is a pictures of the two dividing plates he sent me.

In order to use these plates I also spent some time cleaning the Dividing head. A previous owner had I believe lost the spring clip that holds the sector arms in place. He therefore milled up a replacement setup that unfortunately did not allow complete movement of the sector arms. Here are a few pictures that I'll talk about.


One big reason for this was the ability to braze repair the missing teeth on the back gear and the large gear on the headstock. The back gear is missing 2 teeth approx 180deg apart and the large gear on the headstock is missing one tooth. The plan is to drill into the gear two holes for #10-24 set screw. Screw the two set screws in and then braze around them to fill in where the tooth would be. Once cold clean up the area, grind down the excess braze and then carefully groove out either side of where the teeth would be and then mount the gears in the milling machine and using the proper involute cutter cut new teeth as required. I have one of the two involute cutters here just awaiting delivery of the second one. Here is a picture showing the back gear and the set screw sitting on it. It is not installed because I am waiting for the local Fastenal office to order in a #10-24 bottoming tap.
Last week I mentioned that I was missing a few plates for the Van Norman Dividing head I have. Well over the past little while I've been talking to a fellow in the USA who had a webpage talking about these dividing heads. I had asked him if he had extra plates since he had discussed having a few machined up. Well in conversations he mentioned he did have some however he was waiting to machine up one more set.
Once that was done he would ship me a pair of dividing plates. Well this week was like Christmas, the brand new dividing plates showed up and so far he is refusing my offer of payment for these plates. I am definitely thankful for his generosity. With these two plates and the one I had previously I now have all I need to use this dividing head to repair and manufacture all the gearing for this lathe. Here is a pictures of the two dividing plates he sent me.
In order to use these plates I also spent some time cleaning the Dividing head. A previous owner had I believe lost the spring clip that holds the sector arms in place. He therefore milled up a replacement setup that unfortunately did not allow complete movement of the sector arms. Here are a few pictures that I'll talk about.
First picture shows the aluminium piece a previous owner made on the left, the washer on the right is what I am going to use to make a spring clip. I should actually have a larger washer or piece of steel but this is all I had at the time. I cut it out to the shape of a horseshoe. Once it was cut to the right size I bent the two arms both up and down into wavy motion so that once it was in the groove the clip would stay in place. In the third picture you can kinda see the wavy shape I bent into it. In the fourth picture you can barely see the clip and then the screw head that secures the one sector arm to another so they move around the central point together. Previously the aluminium piece was not allowing the screw to go around it. Some day I will get a larger piece of metal and make the clip larger so that it places pressure in more spots on the sector arms however for now it works.
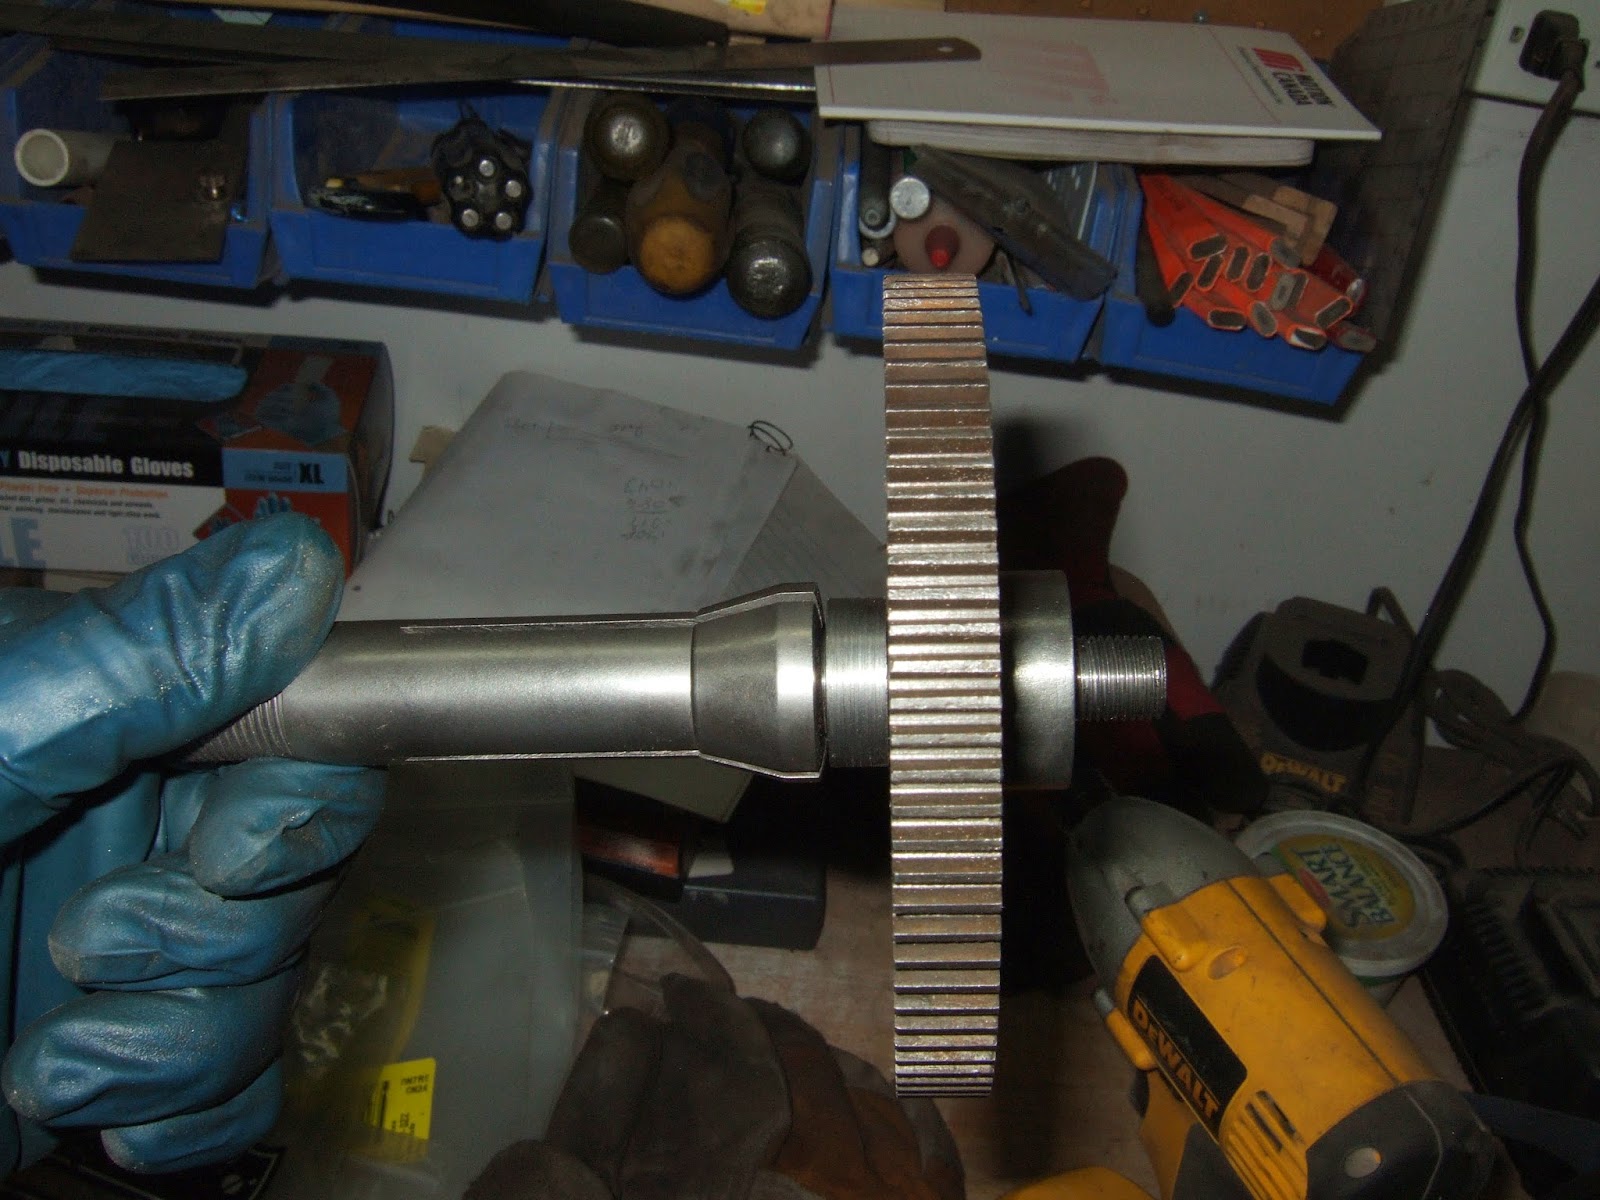
Last thing I did this week was make a homemade mandrel to mount the gears on when I cut the repaired teeth out. I have a complete set of collets for the dividing head with the largest collet being 5/8". So found a piece of scrap round stock and proceeded to machine it down. On one end I have 5/8" dia to fit in the collet and on the other end I have a .685" dia to accept the gears. That end is 1" long so that I could fit two gear blanks on there when cutting new gears. I then turned down the last 3/4" of the shaft to just under 1/2" and threaded it to accept a 1/2"-24 nut to hold the gears in place. The last thing I need to do is cut a groove in the shaft to accept a 1/8" keyway. Will need to order in a 1/8" woodruff cutter to be able to cut this groove and then she'll ready to work. Here are a couple of pictures, one showing the mandrel alone, the other where I have it mounted in the collet and placed a gear on the mandrel so you can see how it would fit together.
Well that's all for this week. I do hope to post again next week however I will state that with my imminent retirement from the Military and working on selling this house and buying one in Niagara-on-the-lake there will be times when I have nothing to post. There will also come a time when I start moving my tools to the new location. When this happens I hope to advise those reading this blog so they realize that I will be on Hiatus probably for most of the late spring and into the summer time period. However until this happens I still hope to be able to post of the trials and tribulations of rebuilding this antique lathe.
Harold
Subscribe to:
Posts (Atom)