Sorry there will not be a descriptive post this week as essentially nothing was done. I did manage to get some time to work on building a cart for the Oxy-Acetylene tanks however nothing was done on the lathe.
I am still awaiting some welding tips for the torch set to be able to braze the gears with the broken teeth. There will also be no post next week Sunday as I will be visiting my Mom. The only essentially good news this past week was I spent my last day working the Ops desk at my Squadron. Next week we need to clear out so that on Tuesday afternoon I have my last release interview and my 32yr plus career in the Canadian Armed Forces, now the Royal Canadian Air Force will have ended. I look forward to some new enterprises and being able to work more on restoring this lathe and possibly other machines as well in the coming future.
See you in a few weeks.
Harold
Sunday, 23 March 2014
Saturday, 15 March 2014
Well first of all my apologies for not posting last weekend. I ended up having a cold for most of the week prior which kept me from doing much extra work as well, I ended up going into work last week Saturday to deal with a unserviceable aircraft overseas. I did manage to get a little work done this week, however again weather and getting tooling or supplies sometimes delayed the work I wanted to do. We did have some fun this week, took the Income tax refund cheque and went out and bought a Victor Medalist 250 series torch set with owner owned tanks. Bought this at the Belleville Linde store where they were on sale for 250$ for the torch set and then another 400$ to buy and fill a set of tanks. We are now able to do Oxy-Acetylene welding and cutting. Here are a couple of pictures of the new toys. Unfortunately I forgot to check the size of the tips with the kit and which size I would require. The kit came with a #0 tip and I will need to purchase a #2 and a #4 as I will need the #4 to work on brazing the broken gears. Oh well another trip into town on Monday morning maybe.


One big reason for this was the ability to braze repair the missing teeth on the back gear and the large gear on the headstock. The back gear is missing 2 teeth approx 180deg apart and the large gear on the headstock is missing one tooth. The plan is to drill into the gear two holes for #10-24 set screw. Screw the two set screws in and then braze around them to fill in where the tooth would be. Once cold clean up the area, grind down the excess braze and then carefully groove out either side of where the teeth would be and then mount the gears in the milling machine and using the proper involute cutter cut new teeth as required. I have one of the two involute cutters here just awaiting delivery of the second one. Here is a picture showing the back gear and the set screw sitting on it. It is not installed because I am waiting for the local Fastenal office to order in a #10-24 bottoming tap.

Last week I mentioned that I was missing a few plates for the Van Norman Dividing head I have. Well over the past little while I've been talking to a fellow in the USA who had a webpage talking about these dividing heads. I had asked him if he had extra plates since he had discussed having a few machined up. Well in conversations he mentioned he did have some however he was waiting to machine up one more set.
Once that was done he would ship me a pair of dividing plates. Well this week was like Christmas, the brand new dividing plates showed up and so far he is refusing my offer of payment for these plates. I am definitely thankful for his generosity. With these two plates and the one I had previously I now have all I need to use this dividing head to repair and manufacture all the gearing for this lathe. Here is a pictures of the two dividing plates he sent me.

In order to use these plates I also spent some time cleaning the Dividing head. A previous owner had I believe lost the spring clip that holds the sector arms in place. He therefore milled up a replacement setup that unfortunately did not allow complete movement of the sector arms. Here are a few pictures that I'll talk about.


One big reason for this was the ability to braze repair the missing teeth on the back gear and the large gear on the headstock. The back gear is missing 2 teeth approx 180deg apart and the large gear on the headstock is missing one tooth. The plan is to drill into the gear two holes for #10-24 set screw. Screw the two set screws in and then braze around them to fill in where the tooth would be. Once cold clean up the area, grind down the excess braze and then carefully groove out either side of where the teeth would be and then mount the gears in the milling machine and using the proper involute cutter cut new teeth as required. I have one of the two involute cutters here just awaiting delivery of the second one. Here is a picture showing the back gear and the set screw sitting on it. It is not installed because I am waiting for the local Fastenal office to order in a #10-24 bottoming tap.
Last week I mentioned that I was missing a few plates for the Van Norman Dividing head I have. Well over the past little while I've been talking to a fellow in the USA who had a webpage talking about these dividing heads. I had asked him if he had extra plates since he had discussed having a few machined up. Well in conversations he mentioned he did have some however he was waiting to machine up one more set.
Once that was done he would ship me a pair of dividing plates. Well this week was like Christmas, the brand new dividing plates showed up and so far he is refusing my offer of payment for these plates. I am definitely thankful for his generosity. With these two plates and the one I had previously I now have all I need to use this dividing head to repair and manufacture all the gearing for this lathe. Here is a pictures of the two dividing plates he sent me.
In order to use these plates I also spent some time cleaning the Dividing head. A previous owner had I believe lost the spring clip that holds the sector arms in place. He therefore milled up a replacement setup that unfortunately did not allow complete movement of the sector arms. Here are a few pictures that I'll talk about.
First picture shows the aluminium piece a previous owner made on the left, the washer on the right is what I am going to use to make a spring clip. I should actually have a larger washer or piece of steel but this is all I had at the time. I cut it out to the shape of a horseshoe. Once it was cut to the right size I bent the two arms both up and down into wavy motion so that once it was in the groove the clip would stay in place. In the third picture you can kinda see the wavy shape I bent into it. In the fourth picture you can barely see the clip and then the screw head that secures the one sector arm to another so they move around the central point together. Previously the aluminium piece was not allowing the screw to go around it. Some day I will get a larger piece of metal and make the clip larger so that it places pressure in more spots on the sector arms however for now it works.
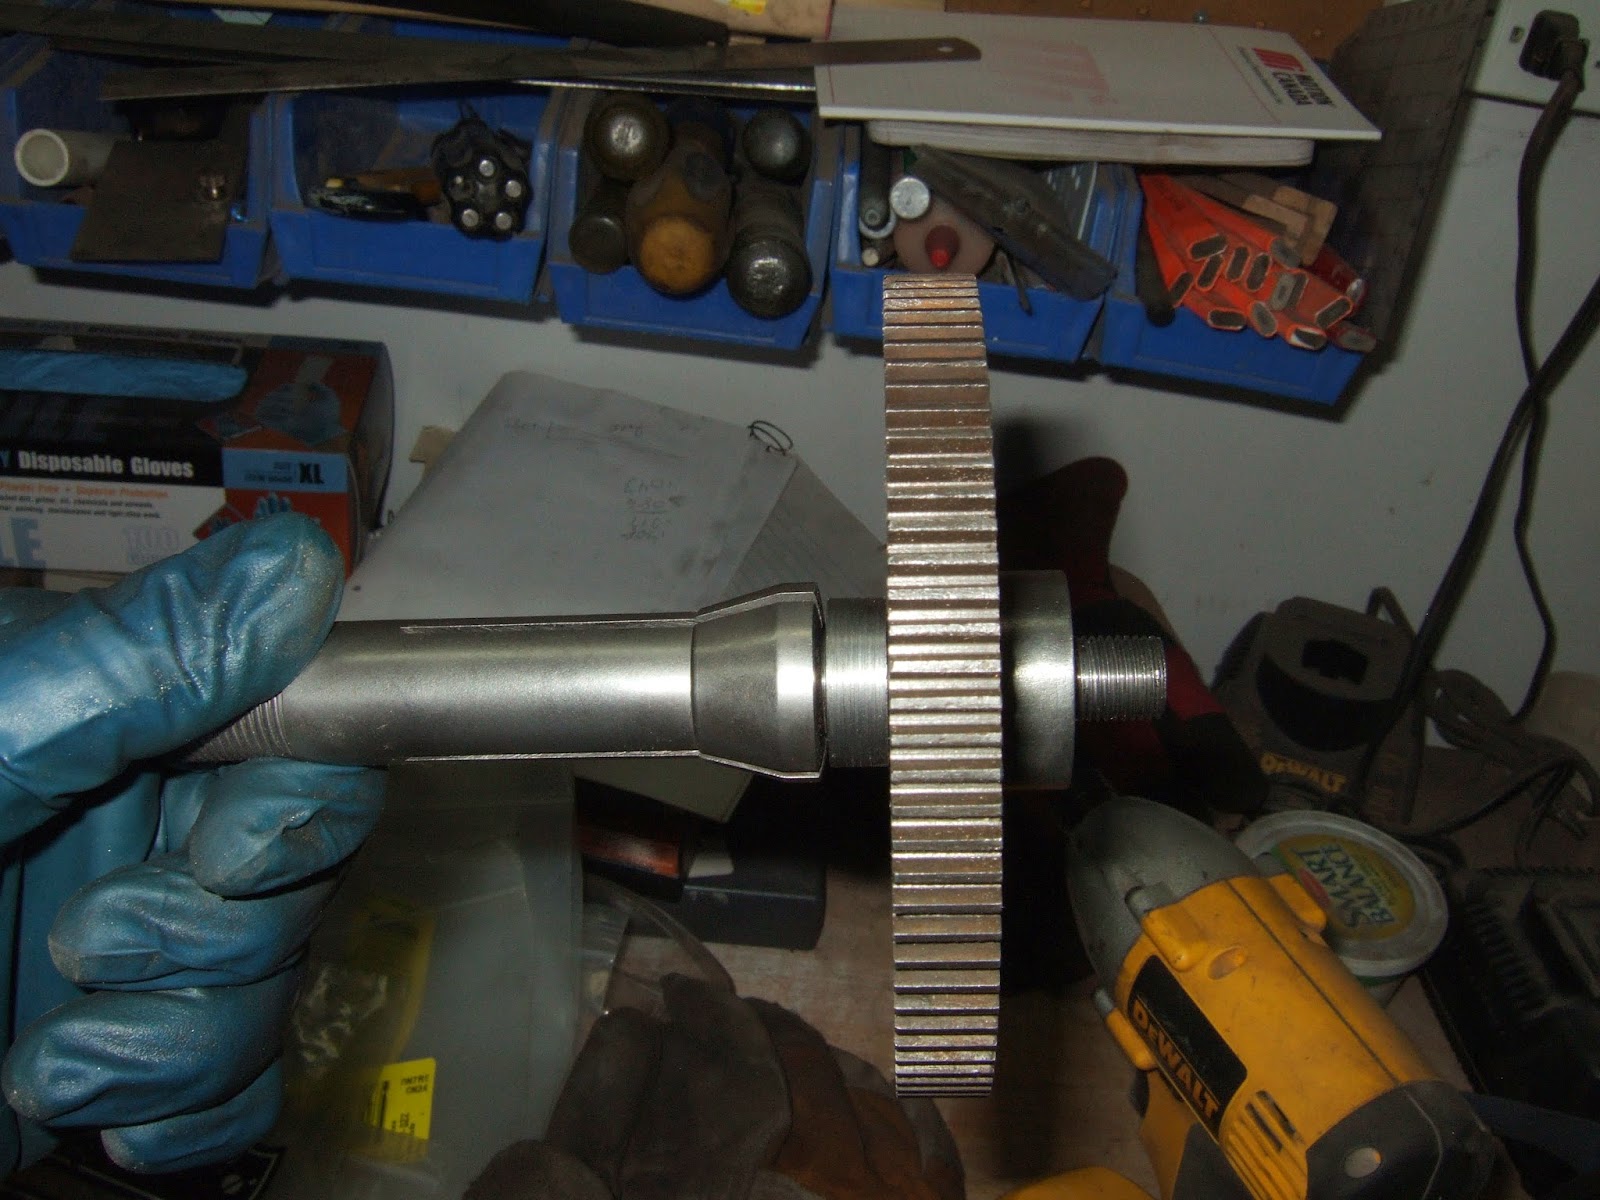
Last thing I did this week was make a homemade mandrel to mount the gears on when I cut the repaired teeth out. I have a complete set of collets for the dividing head with the largest collet being 5/8". So found a piece of scrap round stock and proceeded to machine it down. On one end I have 5/8" dia to fit in the collet and on the other end I have a .685" dia to accept the gears. That end is 1" long so that I could fit two gear blanks on there when cutting new gears. I then turned down the last 3/4" of the shaft to just under 1/2" and threaded it to accept a 1/2"-24 nut to hold the gears in place. The last thing I need to do is cut a groove in the shaft to accept a 1/8" keyway. Will need to order in a 1/8" woodruff cutter to be able to cut this groove and then she'll ready to work. Here are a couple of pictures, one showing the mandrel alone, the other where I have it mounted in the collet and placed a gear on the mandrel so you can see how it would fit together.
Well that's all for this week. I do hope to post again next week however I will state that with my imminent retirement from the Military and working on selling this house and buying one in Niagara-on-the-lake there will be times when I have nothing to post. There will also come a time when I start moving my tools to the new location. When this happens I hope to advise those reading this blog so they realize that I will be on Hiatus probably for most of the late spring and into the summer time period. However until this happens I still hope to be able to post of the trials and tribulations of rebuilding this antique lathe.
Harold
Saturday, 1 March 2014
Well the tooling and supplies showed up so back to work we went.
The first thing we did was to finish of the shake adjusting nut. I had turned down the outside just enough to allow the back gear locking pin to clear the nut. This took a couple of test fittings as I wanted to leave as much material as possible. Once we had the outside dimension dialled in I cut some grooves to allow the knurling wheel to do it's job. I had previously purchased a knurling wheel that had a concave pattern to allow me to make knurls that would be similar to a rope lying down. This was not technically a rope knurl however it was close. I also needed to buy a knurling tool holder to fit my Aloris toolpost. This was one of the tools I was waiting for last week. Once the four knurls were done I removed the nut from the lathe and moved it over to the milling machine. Before mounting it in the milling machine I made three marks 120degrees apart. At each location in the middle of the knurl I bored a 1/4" hole down .175". By only going this deep I did not make a through hole that would allow chips to fall in and possibly damage the bearing. These three holes will allow me to use an adjustable pin wrench to either tighten or loosen the nut if required. I actually hope that this can be tightened and loosened by hand. Here are a couple of pictures showing the grooves in the nut and the nut on the mill getting a hole bored.


After this was done I emailed the other owners of these lathes to ask their collective wisdom as to whether I should drill and tap a small hole in the nut to allow me to oil the thrust bearing it sits over. At this time on the original machines there is no way to add oil to this thrust bearing assembly. The only oil it has is what was coated on it when it was installed. At this time it seems no one else has an oil hole either and so far no issues with the bearing. I'll probably just use a slightly heavier oil on this bearing assembly before installing it.
I next took some time to hone out the cast iron bearings. Both bearings had some scoring inside them. There was no large deep scratches just plenty of little ones. I honed both out with a brake hone and then I placed a piece of pipe in the lathe that was just a little bit smaller than the inside of the bearing and wrapped sandpaper on the pipe. I started with 400grit then went up to 1000grit and finished with 2000grit. While the paper was on the pipe I slide the bearing over the paper and then with the lathe turning around 800rpm, moved the bearing by hand in the opposite direction of the rotation of the pipe and sand paper. By going up these three steps I ended up with a pretty smooth silky finish inside the bearings. Some of the scratches are still there but this will just allow some oil to remain to help lubricate the headstock shaft. Once the two bearings were done I did the same treatment to the headstock shaft in the location where the spindle turns inside the bearing. This time I held the sandpaper while the shaft rotated. Again using the 400/1000/2000 grit sandpaper. Once finished there was a very nice polish on the shaft. Since the shaft is hardened steel there were really no gouges or grooves on the surface of the headstock shaft. Here are a few pictures showing the bearings with a before and after shot as well as the headstock.


Once this was done I spent some time cleaning up some of the change gears that came with the lathe and ensuring they would mount on their respective shafts. Unfortunately I do not have a complete set so will have to make some up somewhere down the line. Here is a picture showing the test fit of a couple of these gears.

The last thing I spent some time on was doing a practice repair on a change gear. Since there are a couple of teeth missing from the large back gear and one tooth missing from the large gear on the headstock I wanted to practice on some other stock before doing these repairs. I had purchased some Aluminum bronze welding rod to use with my Tig welder since I do not have an Oxy/Acetylene torch system. I welded up two gears and am not happy with the way they came out. I don't think this will be an issue on these change gears however I don't want the main gears to get this same treatment. I guess this week I'll go out and look at buying a small Victor welding kit with the small pony tanks and then braze up the teeth on the main gears. Of course I'll practice on some smaller change gears first. However here are a couple of pictures of the practice piece. You'll notice I drilled out two small holes to help with anchoring the weld. In the larger gears on the headstock I plan on drilling and tapping two holes per tooth to thread in some 3/16" set screws to use as a foundation for the weld material.


Now I need to try and get my dividing head to work on the mill so that I can mill out the teeth on the repaired change gear. I purchased some gear cutters a while ago so I have the correct cutter for the change gear however the dividing head I purchased for the Van Norman Milling machine does not have the correct dividing plate with it to index the gear correctly. I am missing two plates with the following hole counts.38-39-41-42-43-46, and 47-49-54-58-62-66 holes per plate. I especially need the plate with the 58 and 54 hole count. If anybody reading this might have some plates for a Van Norman dividing head with these hole counts that you would like to sell please contact me through the comment button below.
Well that's all for now. I'll see you all next week with hopefully another installment of the continuing saga on rebuilding this lathe.
Harold
The first thing we did was to finish of the shake adjusting nut. I had turned down the outside just enough to allow the back gear locking pin to clear the nut. This took a couple of test fittings as I wanted to leave as much material as possible. Once we had the outside dimension dialled in I cut some grooves to allow the knurling wheel to do it's job. I had previously purchased a knurling wheel that had a concave pattern to allow me to make knurls that would be similar to a rope lying down. This was not technically a rope knurl however it was close. I also needed to buy a knurling tool holder to fit my Aloris toolpost. This was one of the tools I was waiting for last week. Once the four knurls were done I removed the nut from the lathe and moved it over to the milling machine. Before mounting it in the milling machine I made three marks 120degrees apart. At each location in the middle of the knurl I bored a 1/4" hole down .175". By only going this deep I did not make a through hole that would allow chips to fall in and possibly damage the bearing. These three holes will allow me to use an adjustable pin wrench to either tighten or loosen the nut if required. I actually hope that this can be tightened and loosened by hand. Here are a couple of pictures showing the grooves in the nut and the nut on the mill getting a hole bored.
After this was done I emailed the other owners of these lathes to ask their collective wisdom as to whether I should drill and tap a small hole in the nut to allow me to oil the thrust bearing it sits over. At this time on the original machines there is no way to add oil to this thrust bearing assembly. The only oil it has is what was coated on it when it was installed. At this time it seems no one else has an oil hole either and so far no issues with the bearing. I'll probably just use a slightly heavier oil on this bearing assembly before installing it.
I next took some time to hone out the cast iron bearings. Both bearings had some scoring inside them. There was no large deep scratches just plenty of little ones. I honed both out with a brake hone and then I placed a piece of pipe in the lathe that was just a little bit smaller than the inside of the bearing and wrapped sandpaper on the pipe. I started with 400grit then went up to 1000grit and finished with 2000grit. While the paper was on the pipe I slide the bearing over the paper and then with the lathe turning around 800rpm, moved the bearing by hand in the opposite direction of the rotation of the pipe and sand paper. By going up these three steps I ended up with a pretty smooth silky finish inside the bearings. Some of the scratches are still there but this will just allow some oil to remain to help lubricate the headstock shaft. Once the two bearings were done I did the same treatment to the headstock shaft in the location where the spindle turns inside the bearing. This time I held the sandpaper while the shaft rotated. Again using the 400/1000/2000 grit sandpaper. Once finished there was a very nice polish on the shaft. Since the shaft is hardened steel there were really no gouges or grooves on the surface of the headstock shaft. Here are a few pictures showing the bearings with a before and after shot as well as the headstock.
Once this was done I spent some time cleaning up some of the change gears that came with the lathe and ensuring they would mount on their respective shafts. Unfortunately I do not have a complete set so will have to make some up somewhere down the line. Here is a picture showing the test fit of a couple of these gears.
The last thing I spent some time on was doing a practice repair on a change gear. Since there are a couple of teeth missing from the large back gear and one tooth missing from the large gear on the headstock I wanted to practice on some other stock before doing these repairs. I had purchased some Aluminum bronze welding rod to use with my Tig welder since I do not have an Oxy/Acetylene torch system. I welded up two gears and am not happy with the way they came out. I don't think this will be an issue on these change gears however I don't want the main gears to get this same treatment. I guess this week I'll go out and look at buying a small Victor welding kit with the small pony tanks and then braze up the teeth on the main gears. Of course I'll practice on some smaller change gears first. However here are a couple of pictures of the practice piece. You'll notice I drilled out two small holes to help with anchoring the weld. In the larger gears on the headstock I plan on drilling and tapping two holes per tooth to thread in some 3/16" set screws to use as a foundation for the weld material.
Now I need to try and get my dividing head to work on the mill so that I can mill out the teeth on the repaired change gear. I purchased some gear cutters a while ago so I have the correct cutter for the change gear however the dividing head I purchased for the Van Norman Milling machine does not have the correct dividing plate with it to index the gear correctly. I am missing two plates with the following hole counts.38-39-41-42-43-46, and 47-49-54-58-62-66 holes per plate. I especially need the plate with the 58 and 54 hole count. If anybody reading this might have some plates for a Van Norman dividing head with these hole counts that you would like to sell please contact me through the comment button below.
Well that's all for now. I'll see you all next week with hopefully another installment of the continuing saga on rebuilding this lathe.
Harold
Subscribe to:
Comments (Atom)