Well it's time to bring you up to date as what's happening in the shop. However as we like to say in the Military first these administrative announcements. If anybody knows of anybody who owns one of these lathes please talk to them and see if they're in contact with me. If they're not please show them this blog and ask them to contact me via the comment section below. If they or you don't want to leave a comment you can email me directly as well at haroldmulder(at)hotmail(dot)com. As well if anybody reading this is from the Casa Grande area of Arizona please contact me as well. We believe there might be one of these lathes located in an abandoned building in your area. We also have a member of the Hardinge Family that has two lathes. I talked about him last week when I stated I bought a taper attachment from him. He's also asked me to post that he has a few more items that he would like to sell. You can contact me via comments below or the email address above so that I can put him in contact with you. Finally if anybody out there is interested in one of these lathes there is one for sale in the Ohio area. Just leave me a comment that you are interested and I will hook you up with the seller.
So onto the work we did this week. First thing we did was take what I call the back plate and clean it up. This plate bolts to the left side of the lathe bed and holds up one side of the QC gearbox and to the left of this plate is the forward/reverse and the three speed transmission for gearing. There were a few parts on here that needed to be removed and cleaned and we also pulled out the old Gits oiler plugs and covers. I now have to try and find a company locally that I can buy these oilers from. Gits will not sell directly and McMaster Carr will not sell to individual Canadians and so far I cannot find a company that easily deals in these items. With the last lathe it was a hard time getting them and I think this time as well. Anyway like I said I cleaned up the plate. Primed it and then painted it. Here are a couple of pictures showing this work.


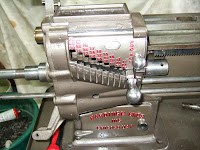
Once this was done I cleaned up the lead screw as well as the other two rods that go along the front of the carriage. One controls the distance the carriage moves and automatically stops it once it reaches a movable limiter. The second one is the drive shaft for the cross feed portion. Here is a picture of cleaning up the lead screw in the #39 lathe. Used Brass brush and various grades of sandpaper folded over to fit into the thread.

Once we had this all cleaned it was time to assemble the QC gearbox and the backplate to the lathe. Unfortunately between one thing and another I think I installed and removed the backplate a dozen times. Not only that I even had the lead screw installed with its taper pin and then had to remove that as well. Unfortunately the Taper pin had to be drilled out. Oh well I did buy extra's. One of the reasons I had to install and remove it was because of those brass washers I made last week. Initially they seemed to work however once I had the backplate securely mounted there was a noticeable grinding coming from the gear box. So I removed the backplate and the QC gears and moved the washers around in various places to see what worked best. In the final analysis the washers are still on the bench and the QC gearbox and backplate are installed on the lathe. I still end up with a gap inside the QC gearbox by the "U" shaped spacer but the assembly runs smoothly. On another note I noticed something again today. While working back and forth on this issue and comparing it to my #39 Lathe I noticed that the "U" shaped washer was not the same size in both lathes. In the #39 it was wider than in the #86. More credence to thought that these lathes had more handwork than some others. Here are a couple of shots once everything was bolted it on. I left the lead screw loose as you can see.


Luckily enough most items are still with the lathe. The only thing missing so far during this work is some nuts and bolts and the locking collar that goes on the extensions of the leadscrew to the left of the QC. Again I needed to make a bolt to hold the backplate on, there were only two small ones and 4 large ones and I needed another small one. Also I needed to make the smaller bolt that holds the shaft retainer casting onto the lathe at the far right. Not sure about the rest of you however on both lathes that casting was broken in the middle. It still works however not the best design unless it was intentional due to stresses or twisting of the lathe body. I also had to make a couple of setscrews for the tensioner bracket that sits to the left of the QC box on the extension of the shaft from the leadscrew. This actually worked easier than I thought it would. Just turned down a length of rod, threaded i,t then made a slot in the end for screw driver. Moved the cutoff blade down the thread to the length required, made an initial cut then beveled those edges using a file and then finished the cutoff. The piece to the right of the cutoff blade was the set screw and the piece to the left was ready for the same procedure to make a second set screw. Here's a picture from the lathe showing this.

Well that's all for this week. Hopefully over the next week I'll manage to get the Gearing cluster cleaned up and back together again. Have a nice week and see you on the flipside.
Harold


No comments:
Post a Comment